ExtremeDullard
Here's a method I've developed to splice filaments almost to perfection without any tools. It's basically the Teflon tube method for cheapskates who don't want to buy Teflon tubing 🙂
First of all, prepare a 2" x 2" (50mm x 50mm) -ish piece of white paper and a straighten a piece of filament that will serve as a mandrel:

Roll up the paper into a tube around the piece of straightened filament as tight as you can. The hard bit is to start rolling: the paper needs to be really snug against the filament to start with.
Once it's started right, it's easy. Roll it up all the way nice and flat. The bit of filament inside should fit inside the tube with quite a lot of friction if you did it right:

You can also wet it a few times with your tongue and it will stay in one piece without holding it. Ex-smoker's habits die hard 🙂

Cut the ends of the filaments to splice together with a sharp bevel:

Carefully thread the ends into the paper tube so they meet halfway:

They should go in with some force but they should slide smoothly. If you feel any roughness, you've snagged the paper inside and it won't work, so you should start over.
Heat up the center of the tube at 250C to 260C while ramming the filaments into each other firmly, but not so firmly as to collapse the paper tube, until you feel them "go" and melt into one another:

I use a SMD rework station because you can apply heat as much as you want and the paper only browns a bit, even if you overdo it grossly. It takes about 30 seconds for the heat to diffuse through the paper and for the filaments to melt fully. It's doable with a lighter too while pushing the filaments together with one hand, but it's less convenient of course.
Then unwrap the paper: some paper should stay stuck to the splice:

Clean up the splice by running a sharp knife along the splice all around. It's pretty quick, the paper isn't terminally fused to the filament:

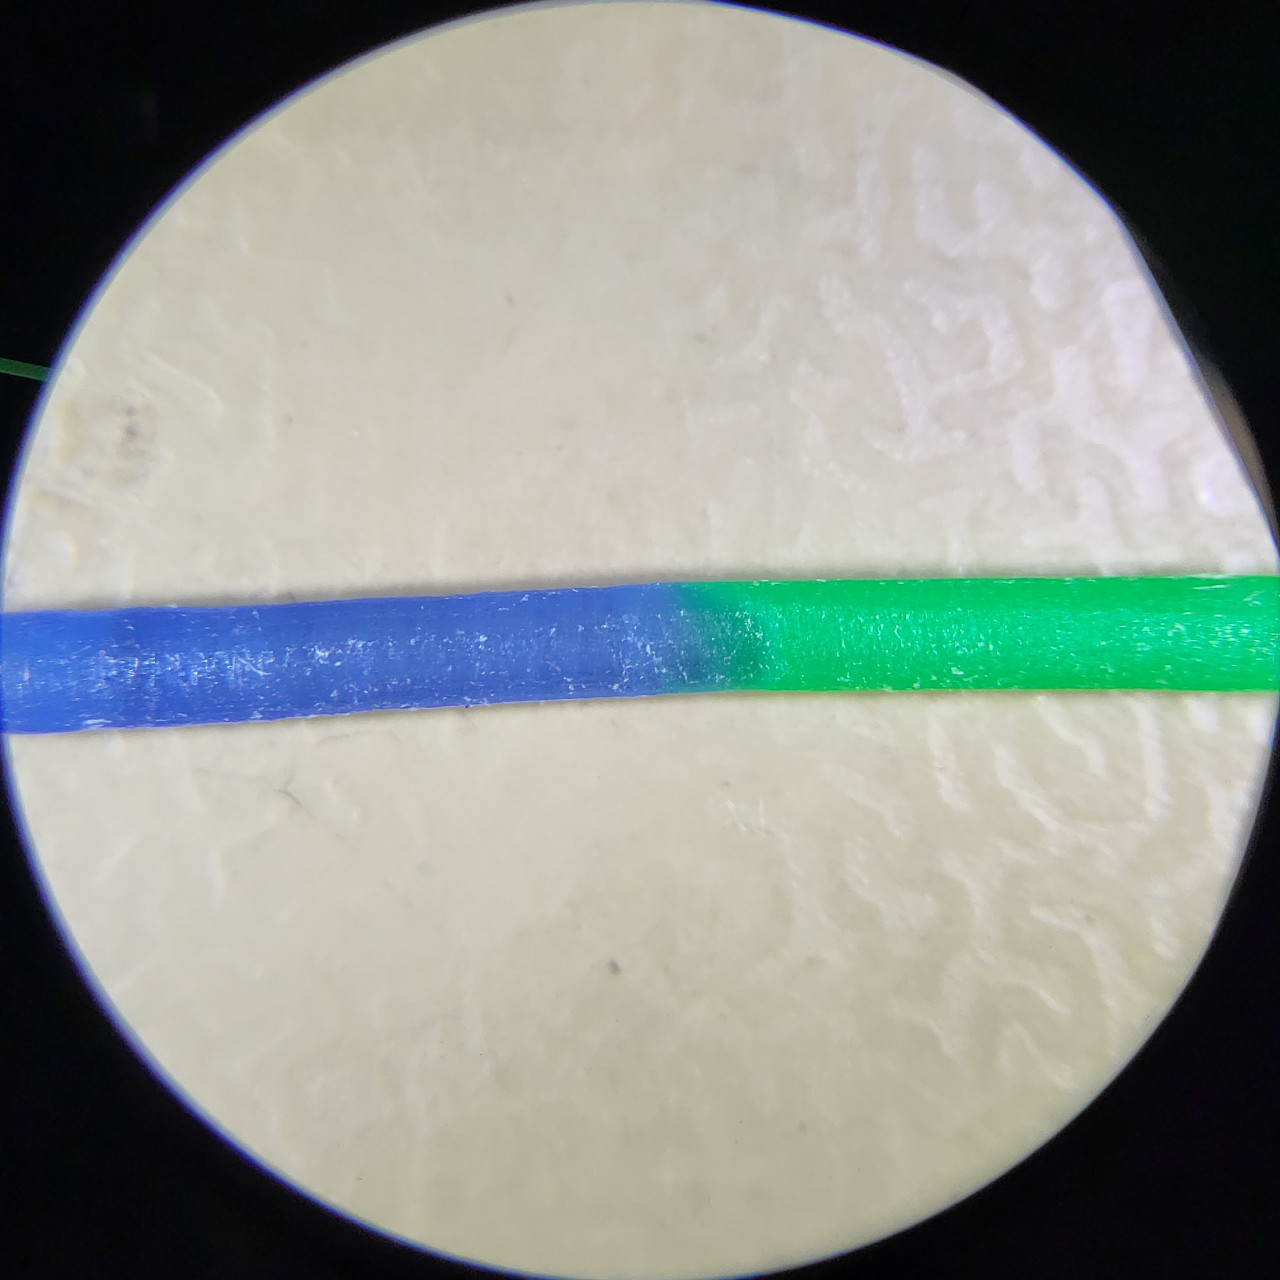
Voila: perfect splice!

And here, seen under a microscope:

Today I printed another one of this box. It's made of two half-shells that are printed with the outer face down on the bed.
The print went fine, but I'm not sure why, one of the half-shells had a whole area where the surface was really bad, with the criss-cross pattern all distorted, and even a single hole in the middle a good few layers deep. it was perfectly attached to the bed, and the print is otherwise perfect and functional. It just looks like crap.
Not wanting to spend another 2 hours reprinting it and wasting a working part, I figured I'd try chemically-polishing the heck out of it with acetone to improve its appearance a bit. Nothing to lose after all...
So lightly sanded the whole surface with 400-grit sandpaper and a block of wood to get rid of the most egregious defects, then I went to town on it with a clean microfiber cloth mounted on a straight edge and soaked with acetone.
I probably wiped the surface with the drenched microfiber cloth 15 times - up, down and sideways alternatively - until the surface looked okay. Not great, it was full of streaks, but better than the original misprinted surface.
I wasn't super-satisfied but I figured I couldn't make it any better. So I moved it aside to let it dry. As I grabbed it, I lightly touched it with my thumbnail, which left a a long, very visible shiny line. And I realized the PLA was so saturated with acetone that, although it looked dry, it has gone really soft.
So grabbed a few paper towels and started scrubbing the surface dry, nice and regular, again up and down and sideways: the plastic started becoming shinier and shiner. The PLA was so soft the paper tower was acting as a soft sandpaper!
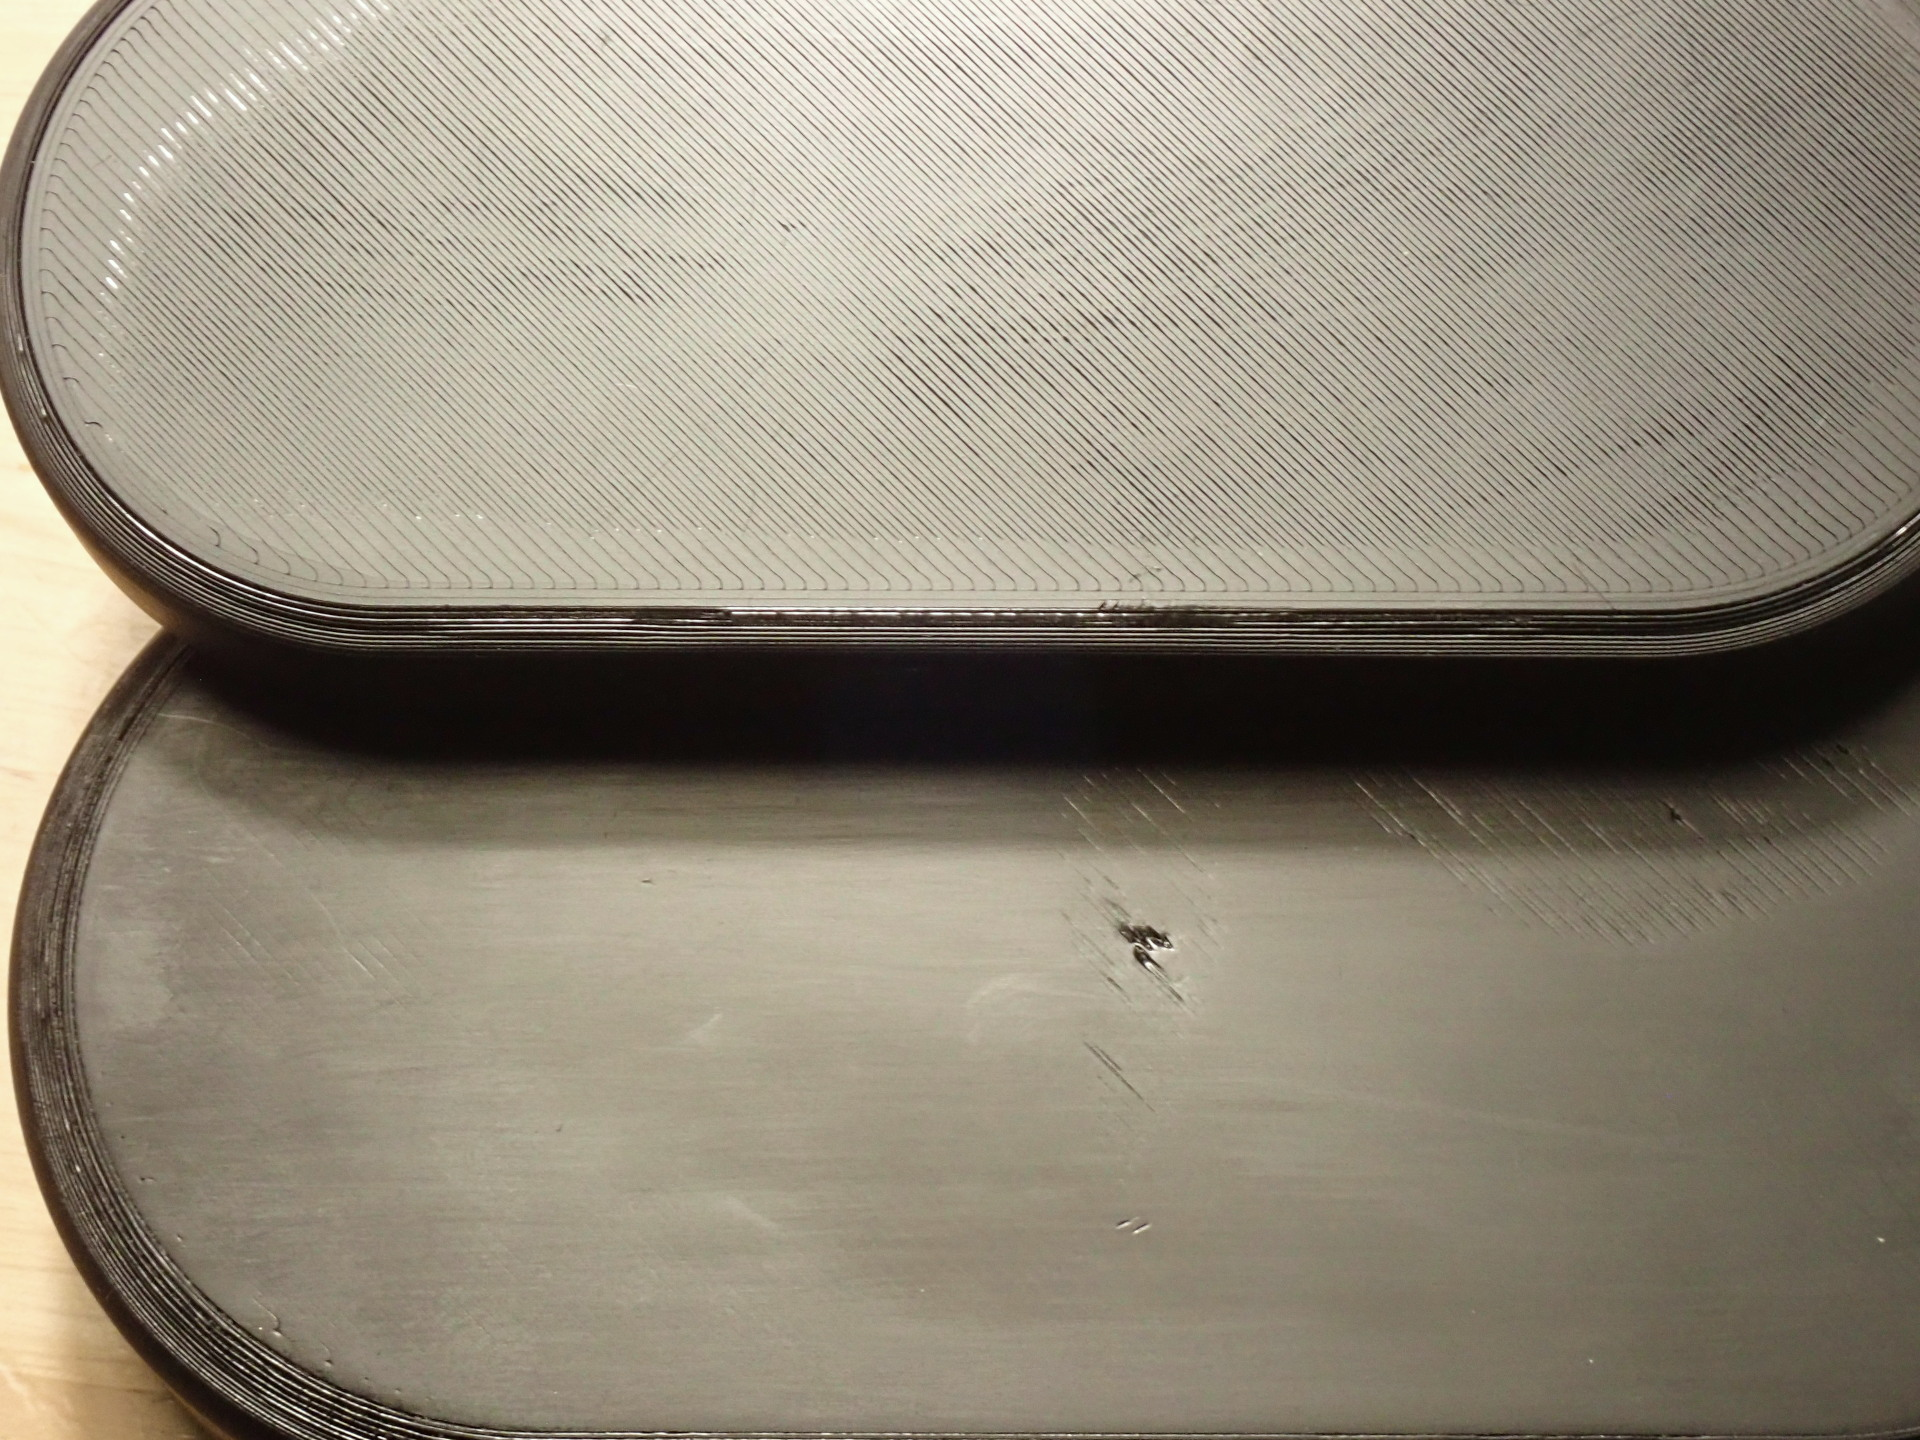
I kept at it until the PLA dried up and hardened again and nothing more was happening. And the result is the surface at the bottom of the photograph. It still has a hole in it - I just can't get that defect out - and you can still see some bad leftover criss-cross lines on the right that run too deep to remove entirely, but otherwise it is quite smooth.
Compared to the normal unpolished surface at the top (which came out of the printer good), it's not bad really. Also, I took the picture under harsh light to show as many surface defects as possible. But under ordinary lighting, the horizontal polishing lines aren't even visible. It's really smooth-looking.
I bet I could bring it out even shinier if I did another acetone soak and used a dry microfiber cloth for a final polish. But it's just a utility box and it'll get scratched up in my backback soon enough anyway, so there's no point.
I'm mentioning this interesting chemical polishing method - I mean soaking the part soft, letting it dry then polishing dry - because I've never done it and it looks really promising. You might want to give it a spin.
And more strangely, does it suddenly go bad?
I printed this pair of glasses with a roll of ugly bright green PLA I use to print prototypes or silly things with - because, well, it's ugly - at the last minute to go to a party where the idea is to not look too serious.
But it took me three tries: the nose bridge readily broke off the first print without even trying very hard, and one hinge split in the middle before I could even drive a pin through it. I was really careful with this third print and I managed to complete the assembly and leave to go to the venue.
But it's really weird: this roll of PLA had been in the printer's room for at least 2 years, I and others have printed a million things with it without any problems as recently as last week - including multiple iterations of these glasses - and today the prints feel "dry", or less "waxy" that other PLA parts when I file them smooth, and they're really brittle.
Also, it's winter and here up north, it gets really dry in the winter - like 15% humidity - so I'm pretty sure the material is quite dry.
What gives? Any idea?

My company ordered a 0.4mm ObXidian nozzle for our Prusa Mk4 printer. We ordered it because someone wanted to print something with abrasive carbon-fiber-reinforced filament.
It's mounted now and It's the same diameter as the stock nozzle we've been using so far. Since I had to run a print and the bgcode file was made for 0.4mm, I just ran the print with plain old PLA.
And... wow! The difference in quality is staggering. Particularly on vertical walls: they're so smooth and shiny, it's incredible. And the top surfaces are so much nicer and smoother than with the regular nozzle. I printed that particular print several times before and while it wasn't bad, it's never been that good.
I didn't realize the nozzle impacted the quality of the print that much.
I found a bunch of super-cheap kids sunglasses at the airport for my 3D-printed clip-on shades. No more concerns about UV damage 🙂
You can download the model here.
